Reverse Sear Bone In Prime Rib
Achieve Steakhouse Perfection with the Reverse Sear Method and Convection Bake
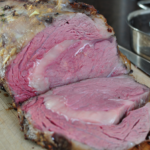
By mastering the reverse sear method in a convection oven, you by-pass the common pitfalls of traditional roasting. Say goodbye to the gray ring and hello to uniform, edge-to-edge medium rare interior that this finest of steaks deserves. By starting the roast at a low temperature, you allow the meat to cook evenly while the convection fan circulates dry air around the exterior. This process dries out the surface of the roast, which is the secret for achieving a heavy, dark and flavorful crust during the final high heat broil to sear.
- Category: Dinner
- Method: Baking
Ingredients
Units
Scale
- 6 to 12 pound bone-in rib roast (boned and tied)
- 2 tablespoons kosher salt
- 1 stick of butter, softened
- 2 tablespoons low-sodium soy sauce
- 8 to 10 cloves of garlic, minced
- 1 teaspoon garlic granules
- 1 teaspoon onion powder
- 6 to 8 sprigs fresh thyme
- 1 large sprig fresh rosemary
Instructions
- Prepare a roasting pan or baking sheet with a wire rack inserted inside the pan. Untie the bones from the prime rib and pat dry any moisture from the roast and bones. Place the prime rib roast on the wire rack and evenly sprinkle salt over the entire roast and bones. You do not need to re-attach the bones now. Just place the bones next to the roast and let that dry brine, uncovered, in the fridge for 1 to 2 days.
- Two hours before the planned cook time, remove the prime rib from the fridge to let that acclimate to room temperature. This will allow for more even cooking.
- Meanwhile, combine the softened butter, soy sauce, minced garlic, garlic granules and onion powder in a bowl. Mix that all together well. Rub this butter mixture all over the prime rib and bones.
- Cut 3 to 6 pieces of kitchen twine long enough to wrap and tie around the roast and bones. You will not place the bones back in its original position. Re-position the bones so that it covers the ribeye cap. Although reverse searing this prime rib will help this roast cook evenly and minimize the overcooked grey edges of the prime rib, re-positioning the bones over the ribeye cap will further help protect the delicate ribeye cap, which is the best part of the prime rib. This will not be a perfect fit and may appear awkward, but position the curve of the bone centered over the middle of the rib eye cap and tie it tightly in place with the kitchen twine. Tuck a few sprigs of thyme between the bones and the roast before tying it together. Lay the rest of the thyme and rosemary sprig on top of the roast.
- Position the entire roast back on the wire rack in your roasting pan. With the bones re-positioned on the rib roast, the bones will now sit on the top/side of the roast. It’s important to keep the wire rack on the pan so the new bottom part of the prime rib will cook evenly.
- Set the bottom oven rack to the the lower-middle level and remove the top rack to allow more space in the oven if needed. Preheat oven to 215°F on convection bake. Insert a Meater Thermometer or other meat thermometer into the center of the prime rib. Cook until the temperature of the rib roast is 5°F below the desired final temperature. It took my 10.75 pound (4 bones) rib roast 2 1/2 hours to reach 125°F.
- Remove the rib roast from the oven and tent it loosely with aluminum foil. Let that sit for 30 minutes and up to 1 1/2 hours.
- Ten minutes before you are ready to serve, set the oven broil to medium (level 2). Remove the foil tent and broil the prime rib for 2 to 3 minutes until you have a nice sear on top. Remove the roast and turn it over to the opposite side and broil for another 2 to 3 minutes until you have a nice sear. You can remove the twine and bones from the rib roast to give the ribeye cap section of the prime rib a sear as well. (I didn’t remove the bones to sear the ribeye cap because the entire rib roast looked so pretty with the bones tied and I wanted to take a picture!)
- Untie and remove the bones, if you haven’t done so already. Carve and serve!
Equipment
Find it online: https://moderateposh.com/reverse-sear-standing-rib-roast/